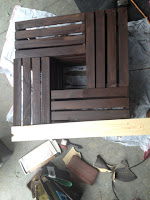
My boyfriend and I found the idea to make a coffee table out of crates from pinterest.
I will be honest, it was difficult! Though, it was fun and it is really cute.
First, finding the crates took us sometime. They were sold out at most craft stores, but we ended up getting them at a store out of town. Just call around to your local craft stores to see if they have them, and if they have any in-stock!
Materials:
-4 crates
-A sander
-Wood Stain
-A drill
-Two pieces of wood
-Flat brackets and L-brackets
-Screws
-Wood screws
Step one: Sanding the crates. Don't sand too much, just enough so the stain will absorb in the wood and it is smooth.
Step two: Staining the crates. Use a smaller paintbrush because you'll need to get into the small creases.
Step three: Put them together. This is where we messed up, put them together like this, then nail them together. We waited until putting them on the base to put them together, and it was a tad uneven, so we had to take them off the base and do this step!
Step four: Measure the base, saw, and sand! We just held our wood up to the base and marked with pencil, it made it easy to get the exact measurements for the base. We sawed the pieces, and sanded them.
Step five: Putting the base together. This wasn't so bad, but when we went to do the center part of the bracket, it got a little tedious. We measured the wood by laying it across this section of the base, and marked it as before. It was just hard getting it to fit tightly together, without one piece being too big or too small.
Step six/seven: placing the brackets on. We went a little bracket crazy. We had just bought a lot and wanted to use them. It really isn't necessary to make have this many. After putting the brackets on, we stained the base.
Step Eight: We put the wheels on the base
Step Nine: We tried using bolts to bolt the crates to the base, but we found that wood screws worked a lot better, and were a lot easier. We screwed each one on the base and this is how it turned out!
Step ten: We used polyurethane spray to spray the inside and around the table. We then used regular polyurethane to brush on the top of the table. We did several coats of this.
Our base was about 1/2 inch too big, so I suggest measuring very carefully. We had a little lip on one side as you can see here, but it is hardly noticeable, and once we get our decorations on it, you won't be able to tell the difference!


No comments:
Post a Comment