Friday, November 30, 2012

DIY Coffee Table From Crates!

My boyfriend and I found the idea to make a coffee table out of crates from pinterest.
I will be honest, it was difficult! Though, it was fun and it is really cute. 
First, finding the crates took us sometime. They were sold out at most craft stores, but we ended up getting them at a store out of town. Just call around to your local craft stores to see if they have them, and if they have any in-stock! 

Materials:
-4 crates
-A sander
-Wood Stain
-A drill
-Two pieces of wood
-Flat brackets and L-brackets 
-Screws
-Wood screws

Step one: Sanding the crates. Don't sand too much, just enough so the stain will absorb in the wood and it is smooth.


Step two: Staining the crates. Use a smaller paintbrush because you'll need to get into the small creases. 


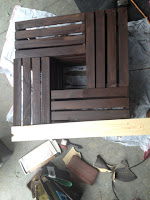
Step three: Put them together. This is where we messed up, put them together like this, then nail them together. We waited until putting them on the base to put them together, and it was a tad uneven, so we had to take them off the base and do this step!


Step four: Measure the base, saw, and sand! We just held our wood up to the base and marked with pencil, it made it easy to get the exact measurements for the base. We sawed the pieces, and sanded them. 


Step five: Putting the base together. This wasn't so bad, but when we went to do the center part of the bracket, it got a little tedious. We measured the wood by laying it across this section of the base, and marked it as before. It was just hard getting it to fit tightly together, without one piece being too big or too small. 


Step six/seven: placing the brackets on. We went a little bracket crazy. We had just bought a lot and wanted to use them. It really isn't necessary to make have this many. After putting the brackets on, we stained the base. 


Step Eight: We put the wheels on the base


Step Nine: We tried using bolts to bolt the crates to the base, but we found that wood screws worked a lot better, and were a lot easier. We screwed each one on the base and this is how it turned out! 

Step ten: We used polyurethane spray to spray the inside and around the table. We then used regular polyurethane to brush on the top of the table. We did several coats of this. 

Our base was about 1/2 inch too big, so I suggest measuring very carefully. We had a little lip on one side as you can see here, but it is hardly noticeable, and once we get our decorations on it, you won't be able to tell the difference! 

Saturday, November 17, 2012

Framed Chalkboard

This is a framed chalkboard.

I made the mistake of buying chalkboard spray paint and tried it on several projects. It didn't turn out well on any of them. I bought the chalkboard paint in the can and it turned out great!
Things you'll need:
-picture frame
-chalk board paint
-sponge brush

1. I took the frame apart and just painted the piece of glass with the chalkboard paint. I put a coat on vertically then went back over it horizontally, I did this several times.
2. I let it dry for about 24 hours and put it in the frame. It's ready to use.

Monday, November 5, 2012

Drawings

I love to draw! Here is a few of my pieces.

Abstract, messing with shading. 


Paper Bags, I am not sure why I like this one so much.

B&W, in the car

Complimentary colors, peace signs and hearts

My Favorite! My Papaw! 

Purple Chucks

A different perspective on a piece I found

Title: Money is the root of all evil

Just playing around with some paint

Wine bottle DIY

I will be posting more wine bottle DIY as I get them done, so keep checking back! 

This was a bottle I had messed up painting so I wrapped it in twine. I just used a little ribbon glue when it began to round toward the neck of the bottle, to prevent the twine from moving up the neck of the bottle and to keep it tight. Then I glued the top and bottom pieces of twine to the bottle. Voila, a vase! I am going to add some embellishments, but I haven't decided what. 


This next wine bottle was a bit interesting to work with. I first tried spray painting the bottles, but it turned out to be more difficult to get the paint to stick and not run off the bottle. I ended up painting the bottles with acrilic paint, but I had to go over it several times for it to cover the bottle really well. I painted on some chalkboard paint and this is how it turned out! 


Baby Shower DIY

I recently held a baby shower for my friend. This is the stuff I made:

I cut out the information on the invite so it wasn't all over the internet. I didn't take step-by-step pictures but it was very simple to make! I will try and get a better picture of the invite and post it.
Supplies:
-Two different patterned scrapbook pages
-A plain sheet of paper
-Ribbon
-Scissors
-Ribbon glue
-Glue stick

1. I measured the envelope then measured the paper so it would fit inside and cut the scrap book paper (polka-dot) to fit
2. I typed up the shower invites using different fonts and colors (it is easier to see in person), then printed them on the plain pink paper
3. I pasted the pink paper on the polka-dot using a glue stick
4. I took the different pattern scrapbook page (stripes) and cut it to fit the space I left on the pink page and then cut it to fit on the polka-dot, and used glue stick to attach it
5. I cut the ribbon to fit on the polka-dot paper and glued it on with ribbon glue

That simple! It was a bit of work considering I had to make 18, but it went more quickly once I got the hang of it! 

I also made this with the help of my friend who I was throwing the shower for:
I can't take credit for this idea, I found it here
Though I did make this one, and it turned out cute, but the original one on the website above is cuter!
Materials:
-Watermelon 
-Cantaloupe
-Grapes
-Strawberries
-Pacifier
-Toothpicks
-Knife
-Melon baller

1. We cut the watermelon in the shape of the carriage by simply drawing the shape in marker then cutting
2. We used the cantaloupe for the head and ears. We simply cut the outer shell off.
3. We had to ball the watermelon to make room for the cantaloupe head
4. We cut the rest of the fruit up and laid it in and around the watermelon and placed the cantaloupe head in the watermelon, attached the ears with toothpicks and cut a hole to insert the pacifier. Finally we added two grapes as eyes with toothpicks. 


Yard Sales

My boyfriend and I have been dating for some time now. We know we want to get married in the next few years and don't want to buy new items now, so we will have items to register for when we get married. We have been going to yard sales to begin to get items we need. We have found great furniture items and decorations at cheap prices. Here are a few things we have found:

We wanted to go with a rustic theme for our living room, so we purchased these three suite cases for $50. We added the lamp and coke bottles for $10! Total price: $60 for a side table! 

We are currently using this suitcases for our coffee table. We are in the middle of making a coffee table now (pictures to come). We got the suitcase and vases from an estate sale for $25, the tray we got for $1 at another yard sale. Total price: $26!

We have these sitting on a bookcase in the corner. The candle sticks were $6 and the vase was $7. Total cost: $13! 

I will post more things that we have found at yard sales soon! Happy Selling! 
Here are some websites that we look at for yard sale locations:
http://www.yardsalesearch.com/
http://www.craigslist.org
http://garagesalefinder.com/