Wednesday, March 6, 2013

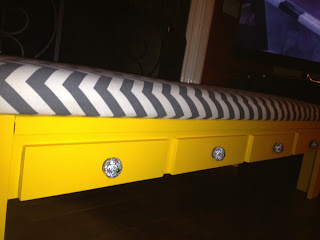
Coffee Table to Bench!

First, we bought this awful coffee table from Goodwill.

Second, we sanded and painted it.


Next, we cut wood to fit on top of the table to fill the holes (where glass was supposed to be, but was missing upon purchase)


Next, we upholstered the top. It really isn't hard. Take padding place it down then wrap it with fabric, grab the staple gun and secure it. It doesn't have to look pretty, no one will be looking under the bench.


Next, we added the knobs, there really isn't drawers here, but I felt the knobs would add a little flare. We bought the knobs at Hobby Lobby, as well as the fabric.
Finally we just secured the top of the bench to the bottom with some screws!


Friday, January 4, 2013

Chalkboard Wine Glasses

I saw this idea all over pinterest, and I had to try it myself. I made a few sets for family members and figured out what works and what doesn't! 

Things you will need:
1. wine glasses, I usually get mine a TJ Maxx because they are inexpensive but durable. 
2. Chalkboard paint. I tried using the chalkboard spray paint, this does NOT work, and I don't recommend it. It doesn't work on glass, and takes away the paint when writing on it. 
3. Ribbon
4. Sponge brush
5. Small bowl

Step 1: I poured some of the paint into the bowl, this helps with getting the paint even on the bottom of the glass. Then I wrapped the wine glasses in tissue paper, up to the bottom of the stem, so the paint wouldn't get on the rest of the glass. 

Step 2: I dipped the bottom of the glass in the bowl and used the sponge brush to wipe off the excess paint. I did this twice in a row, and set the wine glass upside down to dry. Once all of them were complete, they dry pretty quickly, I dipped them each in one-two more times, wiping the excess off as I went. 

Step 3: Wrap a ribbon around the stem of the glass and you are set for a party! 

Very simple, and not too difficult. 


Stemless wine glasses

Another simple, but cute, DIY!!
You just need:
1. Paint pens (you can get these at any craft store)
2. Glasses (I usually get mine from TJ Maxx, they are very durable but inexpensive)

I just simply made up my own designs with the paint pens as I went. You could use stencils, do initials, the skies the limit!


DIY Cake Carrier

This is really simple
All you need:
1. Paint pens
2. Cupcake/cake carrier
3. Stencils

So I just stenciled the initials on using paint pens and then did the polka dots with the paint pens.

That simple!

Friday, November 30, 2012

DIY Coffee Table From Crates!

My boyfriend and I found the idea to make a coffee table out of crates from pinterest.
I will be honest, it was difficult! Though, it was fun and it is really cute. 
First, finding the crates took us sometime. They were sold out at most craft stores, but we ended up getting them at a store out of town. Just call around to your local craft stores to see if they have them, and if they have any in-stock! 

Materials:
-4 crates
-A sander
-Wood Stain
-A drill
-Two pieces of wood
-Flat brackets and L-brackets 
-Screws
-Wood screws

Step one: Sanding the crates. Don't sand too much, just enough so the stain will absorb in the wood and it is smooth.


Step two: Staining the crates. Use a smaller paintbrush because you'll need to get into the small creases. 


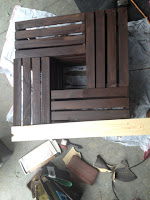
Step three: Put them together. This is where we messed up, put them together like this, then nail them together. We waited until putting them on the base to put them together, and it was a tad uneven, so we had to take them off the base and do this step!


Step four: Measure the base, saw, and sand! We just held our wood up to the base and marked with pencil, it made it easy to get the exact measurements for the base. We sawed the pieces, and sanded them. 


Step five: Putting the base together. This wasn't so bad, but when we went to do the center part of the bracket, it got a little tedious. We measured the wood by laying it across this section of the base, and marked it as before. It was just hard getting it to fit tightly together, without one piece being too big or too small. 


Step six/seven: placing the brackets on. We went a little bracket crazy. We had just bought a lot and wanted to use them. It really isn't necessary to make have this many. After putting the brackets on, we stained the base. 


Step Eight: We put the wheels on the base


Step Nine: We tried using bolts to bolt the crates to the base, but we found that wood screws worked a lot better, and were a lot easier. We screwed each one on the base and this is how it turned out! 

Step ten: We used polyurethane spray to spray the inside and around the table. We then used regular polyurethane to brush on the top of the table. We did several coats of this. 

Our base was about 1/2 inch too big, so I suggest measuring very carefully. We had a little lip on one side as you can see here, but it is hardly noticeable, and once we get our decorations on it, you won't be able to tell the difference! 

Saturday, November 17, 2012

Framed Chalkboard

This is a framed chalkboard.

I made the mistake of buying chalkboard spray paint and tried it on several projects. It didn't turn out well on any of them. I bought the chalkboard paint in the can and it turned out great!
Things you'll need:
-picture frame
-chalk board paint
-sponge brush

1. I took the frame apart and just painted the piece of glass with the chalkboard paint. I put a coat on vertically then went back over it horizontally, I did this several times.
2. I let it dry for about 24 hours and put it in the frame. It's ready to use.

Monday, November 5, 2012

Drawings

I love to draw! Here is a few of my pieces.

Abstract, messing with shading. 


Paper Bags, I am not sure why I like this one so much.

B&W, in the car

Complimentary colors, peace signs and hearts

My Favorite! My Papaw! 

Purple Chucks

A different perspective on a piece I found

Title: Money is the root of all evil

Just playing around with some paint